|
Table of Contents |
There are many countermobility assets and methods at the commander's disposal. This chapter describes the employment and execution of countermobility activities other than minefields. Employing all types of obstacles will provide flexibility to the commander and increase the variety of obstacles that the enemy must encounter.
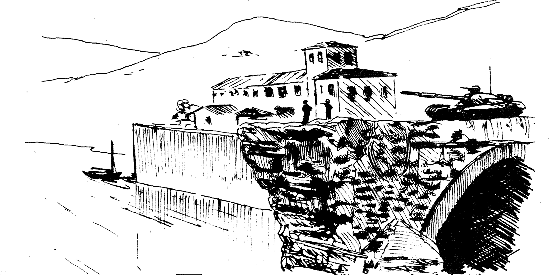
Streams and rivers are formidable obstacles to mobility. In most developed countries of the world, bridges have been constructed to span these waterways along lines of communication. Generally, roads and railroads also follow what would be likely military avenues of approach. The use of existing bridges is critical to the mobility of a military force. Without existing bridges, forces must conduct river crossings using tactical bridging. A river crossing operation is one of the most difficult operations to perform successfully as it normally requires extensive time and resources.
By demolishing or rendering existing bridges unserviceable, we can force the enemy to use time and resources to conduct tactical river crossings. The vulnerability of the enemy is greatly increased during river crossings and presents a good opportunity to destroy his forces.
Bridge destruction cannot be accomplished haphazardly. There are several very important factors that must be considered and planned such as:
Only that portion of the bridge essential to accomplish the military objective should be destroyed. In some instances where the span is short or the bridge has no intermediate supports, destruction of the entire bridge may be required. In other instances where the bridge is large, dropping a single span may prevent enemy use, conserve demolitions, and make the bridge easier to reconstruct at a later date. Enemy capability must be a prime consideration in making this decision.
The answer to this question is tactically dependent. Had the Germans blown the Remagen bridge several days earlier, many of their problems would not have occurred. (See chapter 3.) At the same time, they may have isolated some of their forces on the far bank. If a bridge is blown too early, it may give the enemy time to change direction and therefore not impede his mobility at all. Waiting too long may enable the enemy to capture the bridge intact. The commander must make this tough decision only after considering the factors involved.
The location of friendly forces and future plans of the command are prime factors. Coordination is required with higher, lower, and adjacent units, as well as other services in many cases. A worst case example would be for air assets to prematurely destroy a bridge that would be a major avenue of approach for a ground counterattack.
Major bridge destruction requires substantial amounts of time, personnel, and explosives. Planning and coordinating must occur early to insure that resources are available and targets are executed at the proper time.
Unnecessary destruction of bridges has a major impact upon the local population. As with any other denial target, care should be taken to minimize that impact.
Craters are effective obstacles to enemy movement when constructed properly and located at critical points along his movement route. Craters are normally placed on roads or other high speed movement routes the enemy is expected to use. They should be placed at locations that cannot be easily bypassed such as cuts or fills. The basic purposes are to delay or stop the enemy, cause his forces to bunch up and provide good targets, and force him to use up breaching assets such as bridging and earthmoving equipment. Use of antipersonnel and antitank mines in conjunction with craters creates formidable obstacles.
Craters should be placed in depth to prevent the enemy from conducting a single breach and continuing on. There are essentially two placement methods:
1 Place craters adjacent to each other.
2 Place craters 100 to 1,000 meters apart.
1 Place craters adjacent to each other. This method makes the obstacle extremely difficult to breach by earthmoving equipment and by a tracked-vehicle launched bridge. The loose soil will cause the bridge to rest unevenly, and exiting vehicles will have no place to go except into an adjoining crater. When using this method, care must be taken during the demolition process so that soil blown from one crater does not come to rest in adjacent craters and thus reduce their obstacle value.
2 Place craters 100 to 1,000 meters apart. This method forces the enemy to conduct several breaches. The factors of METT-T will determine the best crater design and location. In any case, craters should be tied into existing or reinforcing obstacles and covered by direct fire weapons.
To be effective obstacles, craters must be too wide to be spanned by tracked vehicles, and too deep and steep-sided for any other vehicle to pass through them. Blasted road craters will not stop modern tanks indefinitely, because repeated attempts by the tank to traverse the crater will pull loose soil from the slopes of the crater into the bottom, reducing both crater depth and slope angles. Road craters must be large enough to tie into natural or man-made obstacles at each end. The effectiveness of craters may be improved by placing log hurdles on either side, digging the face nearly vertical on the friendly side, and mining the site with antitank and antipersonnel mines. Wire placed in the crater will add to the difficulty of mine clearing.
There are two common methods of blowing craters:
1 Conventional method, using boreholes loaded with explosives.
2 The M180 Demolition Cratering Kit.
All military explosives may be used for blasting antitank craters. A special 40-pound cratering charge (ammonium nitrate) issued in a waterproof metal container is specifically designed for blowing craters and, if available, should be used with the conventional method. The M180 kit comes complete with explosive.
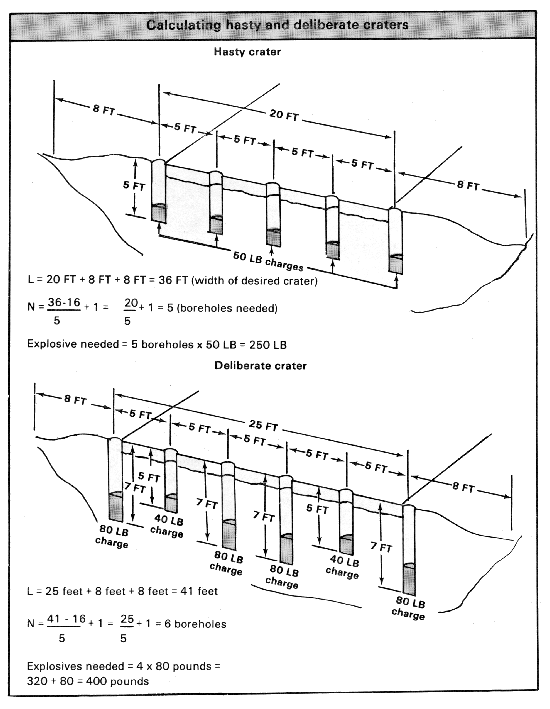
A hasty road crater is emplaced when time and explosives are limited. It is not as effective as the deliberate crater, which will be described later. The hasty cratering method produces a crater 6 to 7 feet deep, and 20 to 25 feet wide with side slopes of 25 to 35 degrees. In forming a hasty road crater, all boreholes must beat least 5 feet deep, each loaded with at least 50 pounds of explosive. Following are the steps necessary to blow a hasty crater.
Step 1: Calculate the number of boreholes necessary. Use the formula:
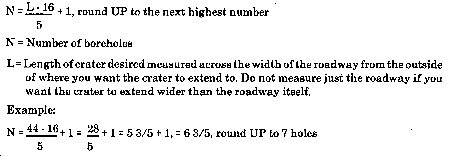
Step 2: Space the boreholes 5 feet apart starting at the center of the roadway and extending in each direction of the desired crater.
Step 3: Dig all boreholes to the same depth (at least 5 feet).
Step 4: Load each borehole with 50 pounds of explosive.
Step 5: Dual prime all charges with detonating cord and connect them to fire simultaneously.
Step 6: Stem or backfill all boreholes with suitable material (soil or sandbags).
Step 7: Blow the crater.
This cratering method produces road craters which are more effective than those resulting from the hasty method but require more time and explosive. The deliberate method produces a deeper (7 to 8 feet), wider (25 feet), and steeper-sided (30 to 37 degrees) crater than the hasty method. The calculations for a deliberate crater are the same as a hasty crater with the following exceptions:
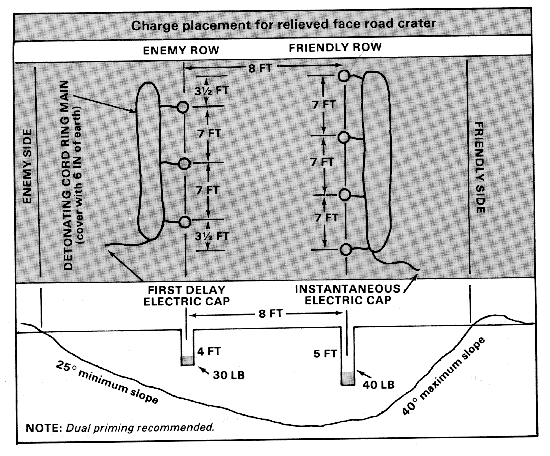
This cratering method produces road craters that are more effective obstacles to modern tanks than the hasty or deliberate method, but they require still more time and explosive than the hasty or deliberate. This technique produces a trapezoidal-shaped crater about 7 feet deep and 25 to 30 feet wide with unequal side slopes. In compact soil such as clay, the relieved face cratering method will provide an obstacle shaped as shown in the top view, below. The side nearest the enemy slopes at about 25 degrees from the road surface to the bottom, while that on the opposite or friendly side is about 30 to 40 degrees steep. The exact shape, however, depends on the type of soil found in the area of operations. The procedure is as follows:
Step 1: On dirt or gravel-surfaced roads, drill or blast two rows of boreholes 8 feet apart, spacing the boreholes on 7-foot centers. On hard-surfaced roads, drill the two rows 12 feet apart. The number of charges for the friendly side row can be calculated by the formula:

Any fractional number of holes should be rounded UP to the next highest number. Stagger the boreholes in the row on the enemy side in relationship to the other row, as shown in the sideview, below. The enemy side row will always contain one less borehole than the row on the friendly side.
Step 2: Make the boreholes on the friendly side 5 feet deep and load with 40 pounds of explosive; on the enemy side, 4 feet deep and load with 30 pounds of explosive.
Step 3: Prime the charges in each row separately for simultaneous detonation. There should be a detonation delay of ½ to 1½ seconds between rows, the row on the enemy side being detonated first. Best results will be obtained if the charges on the friendly side are fired while the earth moved in the first row is still in the air. Standard delay caps may be used for delay detonation.
Step 4: If adequate means for sufficient time for delay firing are not available, acceptable results may be obtained by firing both rows simultaneously. However, the resulting crater will not have the same depth and trapezoidal shape as previously described.
Step 5: To prevent misfires from the shock and blast of the row of charges on the enemy side (detonated first), the detonating cord mains and branch lines of the row on the friendly side (detonated last) must be protected by a covering of about 6 inches of earth.
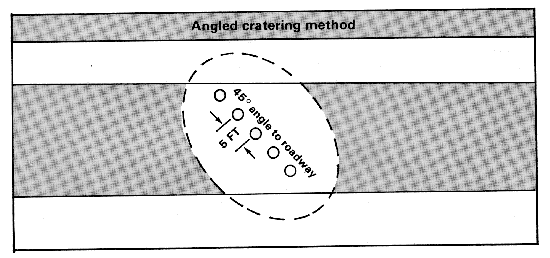
This method is useful against tanks traveling in defiles or road cuts where they must approach the crater straightway. The road crater is blasted using either the hasty or deliberate cratering methods, except the boreholes are drilled across the roadway at about a 45-degree angle as shown. Because of the angle tanks must attempt to cross, they tend to slip sideways and ride off their tracks.
Boreholes for cratering charges may be dug by using motorized post hole augers or handheld post hole augers or diggers, or blasted using shaped charges. Making the boreholes is normally the most time-consuming task related to cratering.
Hard-surfaced pavement of roads and airfields is breached so that holes may be dug for cratering charges. This is done effectively by exploding tamped charges on the pavement surface. A 1-pound charge of explosive is used for each 2 inches of pavement thickness. The charge is tamped with material twice as thick as the pavement. Boreholes which have been drilled or blasted through pavement and contain placed charges can also breach pavement. (A shaped charge readily blasts a small diameter borehole through the pavement and into the subgrade.) Concrete should not be breached at an expansion joint because the concrete will shatter irregularly.
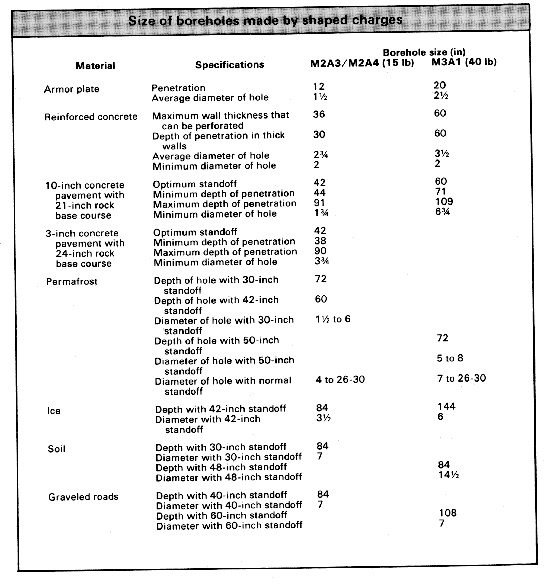
Standard shaped charges may be used to blast boreholes in both paved and unpaved surfaces for rapid road cratering with explosives. The 15-pound M2A4 shaped charge, detonated at 3 ½ foot-standoff, and the 40-pound M3A1 shaped charge, detonated at 5-foot standoff; will blast boreholes of depths up to 9 feet with diameters 7 inches and larger in both reinforced concrete pavements and gravel-surfaced roads. For maximum effectiveness, M3A1 shaped charges should be used to blast boreholes in thick, reinforced concrete pavements laid on dense highstrength base courses. The M2A4 shaped charges may be used effectively to blast cratering charge boreholes in reinforced concrete pavement of less than 6-inch thickness laid on thin base courses, or to blast boreholes in unpaved roads. Almost all types of military explosive, including the cratering charges, can be loaded directly into boreholes made by the M3A1 and M2A4 shaped charges. Shaped charges do not always produce open boreholes capable of being loaded directly with 7-inch diameter cratering charges without removing some earth or widening narrow areas. Many boreholes having narrow diameters but great depth can be widened simply by knocking material from the constricted areas with a pole or rod, or by breaking off the shattered surface concrete with a pick or crowbar. For road cratering on asphalt or concrete-surfaced roadways, blasting the boreholes with shaped charges will expedite the cratering task by eliminating the requirement for first breaching the pavement with explosive charges.
A good rule of thumb is to increase by one-and-one-half to two times the number of boreholes and charges from those calculated by standard formulas for moderate climates. Frozen soil, when blasted, breaks into large clods 12 to 18 inches thick and 6 to 8 feet in diameter. As the charge has insufficient force to blow these clods clear of the hole, they will fall back into it when the blast subsides. Testing should be made to determine the number of boreholes needed before extensive blasting is attempted. In some cases, permafrost may be as difficult to blast as solid rock.
Using standard drill equipment has one serious defect--the air holes in the drill bits freeze and there is no known method of avoidance. Steam point drilling is satisfactory in sand, silt or clay, but not in gravel. Charges must be placed immediately upon withdrawal of the steam point, otherwise the area around the hole thaws and plugs it. Shaped charges also are satisfactory for producing boreholes, especially for cratering. A low velocity explosive like ammonium nitrate should be used if available. The heaving quality of low velocity explosives will aid in clearing the hole of large boulders. If only high velocity explosives are available, charges should be tamped with water and permitted to freeze. Unless high velocity explosives are thoroughly tamped, they tend to blow out of the borehole.
Access holes
Access holes are used for water supply and to determine ice thickness in computing safe bearing pressures for aircraft and vehicles. As ice carries much winter traffic, its bearing capacity must be rapidly ascertained when forward movements are required. Small diameter access holes are made by shaped charges. On solid lake ice, the M2A4 penetrates 7 feet and the M3A1, 12 feet. These charges will penetrate farther, but the penetration distances were only tested in ice approximately 12 feet thick. If the regular standoff is used, a large crater forms at the top which makes considerable probing necessary to find the borehole. If a standoff of 42 inches or more is used with M2A4 shaped charge, a clean hole without a top crater is formed. Holes made by the M2A4 average 3½ inches in diameter, while those made by the M3A1 average 6 inches.
Ice conditions
In the late winter, ice grows weaker and changes color from blue to white due to aging. Although ice structure varies and its strength depends on age, air temperature, and conditions of the original formation, the same size and type of crater is formed regardless of the standoff distance. If the lake or river is not frozen to the bottom and there is a foot or more water under the ice, the water will rise to within 6 inches of the top after the hole is blown, carrying shattered ice particles with it. This makes the hole easy to clean. If the lake is frozen to the bottom, the blown hole will fill with shattered ice and clearing will be extremely difficult. Under some conditions, shaped charges may penetrate to a depth much less than that indicated in the table below.
Surface charges
Surface craters may be made with ammonium nitrate cratering charges or demolition blocks. For the best effects, the charges are placed on the surface of cleared ice and tamped on top with snow. The tendency of ice to shatter more readily than soil should be considered when charges are computed.
Underwater charges
Charges are placed underwater by first making boreholes in the ice with shaped charges, and then placing the charge below the ice. An 80-pound charge of M3 demolition blocks under ice 4 ½ feet thick forms a crater 40 feet in diameter. This crater, however, is filled with floating ice particles and, at temperatures around 20 degrees Fahrenheit (F), freezes over in 40 minutes.
A vehicle obstacle may be cratered in ice by sinking boreholes 9 feet apart in staggered rows. Charges (tetrytol or plastic) are suspended about 2 feet below the bottom of the ice by means of cord with sticks bridging the tops of the holes. The size of the charge depends upon the thickness of the ice. An obstacle like this may retard or halt enemy vehicles for approximately 24 hours at temperatures around -24 degrees F.
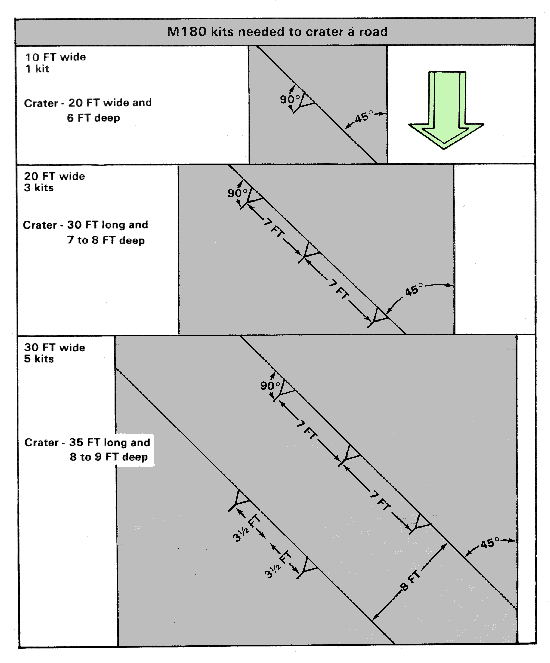
The M180 demolition cratering kit is specially designed to produce craters in all types of soil and road surfaces, to include reinforced concrete. The kit is self-contained and consists of a shaped charge, a firing device, a 40-pound cratering charge, rocket motor, tripod, and demolition circuit. The M180 can create craters much more rapidly than methods previously described. The M180 can be employed in various configurations dependent upon the width of the desired crater. The figure below shows how to determine the number of kits necessary to crater roads of varying widths, and proper spacing and alignment. The M180 can be erected and fired within 20 minutes of arrival on site by two soldiers. It requires no site preparation.
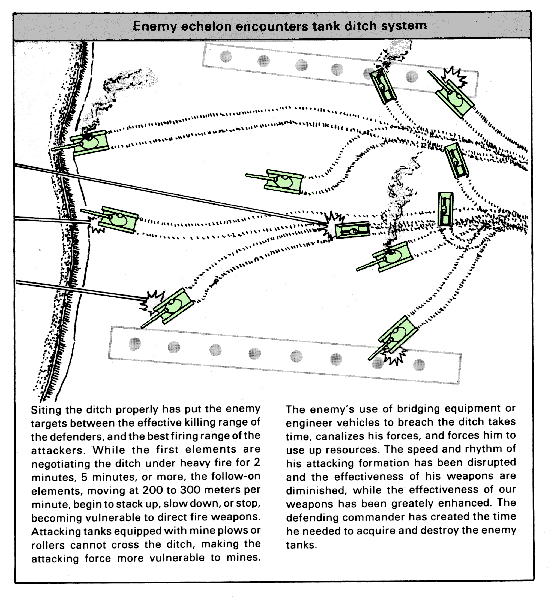
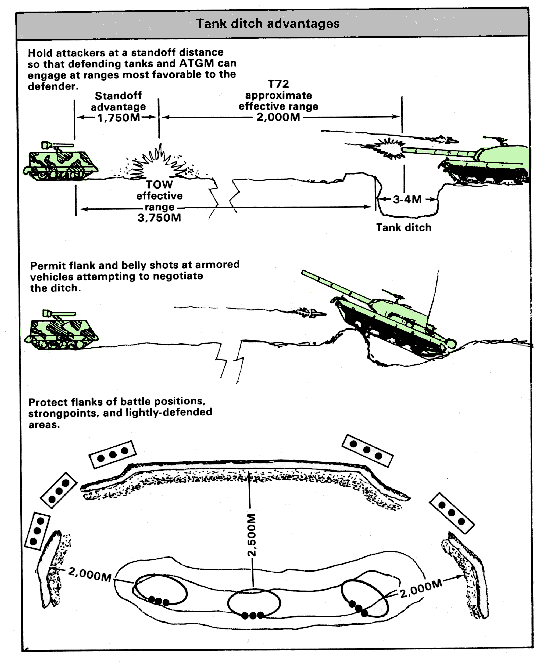
Tank ditches are one way to degrade an attacking force's speed and mobility. They impede the advance by slowing vehicles and confusing the crews. Well-planned tank ditches have the advantages shown and described.
Tank ditches should complement existing obstacles to include:
Construction of antitank ditches is time and equipment intensive. Maximum use should be made of the terrain. Also, the shortest antitank ditch or ditch system possible should be used.
A tank ditch alone is not an adequate obstacle and will not stop a determined attacker. Additional procedures to increase ditch effectiveness are to--
When planning emplacement of tank ditches, keep this in mind: Soviet commanders rely on carefully rehearsed tactical formations for control in the attack. You can disrupt the momentum of the attack and force directional changes in attacking vehicles, thus exposing their vulnerable flanks. This is done by imaginative placement of ditches with other obstacles. Tank ditches should be placed in a series or, if time is available, in a random pattern. Placing the ditch or ditches at 90-degree angles to enemy's avenue of approach may not always be the best tactical use. Consider the terrain and assets available, and construct ditches in a pattern that will confuse, present good targets, and force the enemy to use resources to breach.
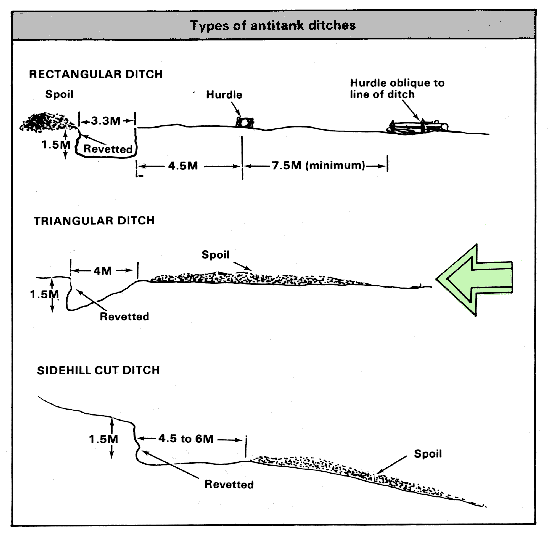
The configuration of the most effective tank ditch has been a subject of much discussion and field testing with such constraints as time and equipment available, and soil conditions. The most efficient ditch is either a rectangular or triangular ditch.
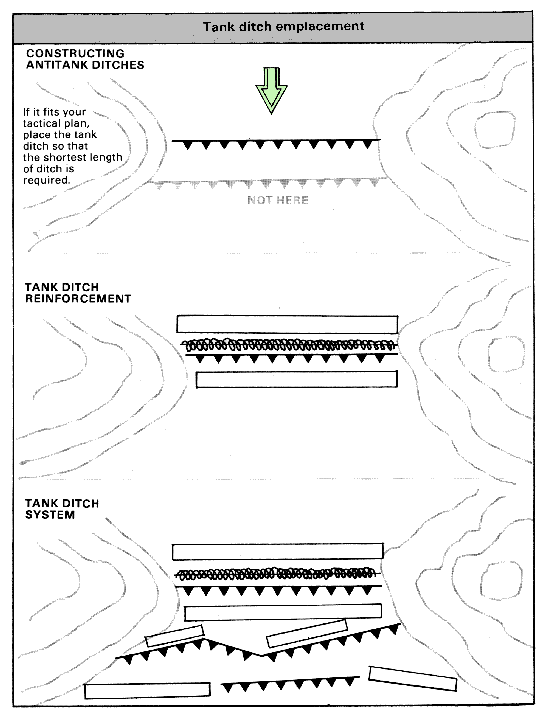
Frequently, you can save time, materials, and manpower by improving existing gullies or ditches rather than constructing entirely new ones. One method is to excavate along natural drainage or contour lines to create a sidehill cut ditch. It would be beneficial if the ditch can be made to retain water. Muddy soil further degrades mobility. Place antitank mines in the soil and antipersonnel mines in the bottom of the ditch to discourage infantry soldiers. Depending on soil type, sides of ditches may have to be reinforced to prevent crumbling, and also to make the ditch more difficult to cross. Continuous direct fire should cover the ditch and force the enemy to deploy before reaching the ditch. Scatterable mines on probable approach routes can further slow vehicular movement.
Construction
A ditch 3.3 meters wide cannot be "bridged" by tanks alone.
A ditch 1.5 meters deep in consolidated, firm soil cannot be crossed by tanks or other vehicles without the aid of bridging or earthmoving equipment.
A ditch 1.2 meters deep in firm soil should be considered "expedient" and capable of only a few minutes delay on the attacker.
Rectangular ditches in sand must be greater than 1.6 meters deep to be considered more than just an expedient ditch.
Rectangular ditches should have a 1- to 2-meter berm on their friendly side which serves to increase the obstacle height, decrease traction to crossing tanks, greatly impede breaching with scissor-type bridges, and keep the enemy from pushing the soil back into the ditch without exposing their dozers or tanks with plows.
Effects and results
The effectiveness of tank ditches is measured by the delay time imposed and targets presented. It is a function of soil type and condition, and ditch width and depth. The rectangular ditch has proven to be the most effective in imposing delays in both directions. Results of tests on crossing rectangular ditches in various soil types are shown below. The ditch must be wide enough to prevent the tank from simply running over it, and narrow enough to force the tank to expose itself to our defense firepower. A 3.3-meter width (equivalent to a D7 dozer's blade) satisfies this criteria.

Construction
Entrance slope is not critical in determining the effectiveness of triangular ditches.
Subjective estimates suggest "the steeper the wall the better."
A ditch 1.5 meters deep in hard clayey soils cannot be breached by tanks alone except under unusual conditions.
A ditch 1.2 meters deep in hard soil should be considered "expedient" and capable of imposing only a few minutes delay on the attacker.
Triangular ditches in sand must be greater than 1.8 meters deep to be considered more than just an expedient ditch.
To deny the use of the triangular tank ditch as a fighting position for the attacking armor, the spoil should be spread loosely on the enemy side rather than used as a berm. This will also reduce tank traction when approaching the ditch.
Effects and results
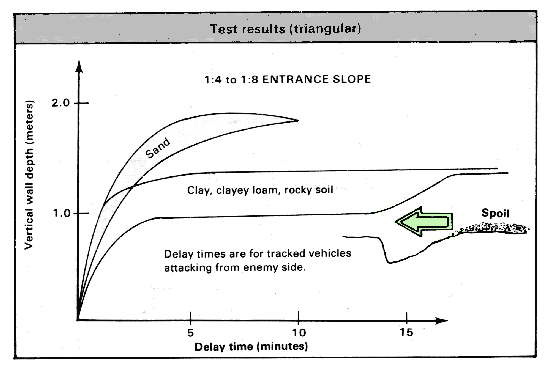
Results of tests on crossing triangular ditches in various soil types and resulting delay times are shown below. Triangular ditches are two to four times faster to cross than rectangular ditches when counterattacking. All tanks can easily cross from the friendly side, and most smaller combat vehicles can counterattack across if following in lanes where tanks have crossed.
Earthmoving equipment such as the M9 Armored Combat Earthmover (ACE), dozers, scrapers, Combat Engineer Vehicles (CEVs), and bucket loaders can all be used for tank ditching. Generally, the equipment is much more effective if used in teams rather than alone. The M9s, dozers, and scrapers are most effective, while bucket loaders and CEVs are used as a last resort. Various combinations can be used. Some typical team configurations could be:
This list is not inclusive. Units should practice and experiment using various equipment and operator combinations to determine what works best for their area and what equipment is available. Frozen or extremely hard soil will most likely have to be ripped with dozer mounted rippers prior to digging.
Following are four proven methods for tank ditch construction using organic engineer equipment.
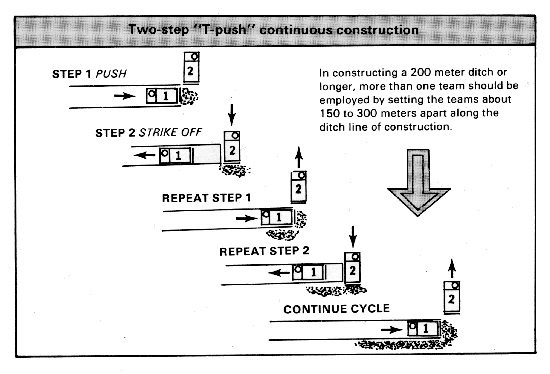
Two dozers or two M9s (ACES) as a team. In step 1, vehicle #1 will start the ditch and push a load up to 9 to 10 meters (29 to 33 feet) from the start point, and then back up to start the cut again. In step 2, vehicle #2 will push the load away from the ditch to form a berm as vehicle #1 is backing up. The team continues performing in this manner to construct the ditch. This "T-push" method is suitable for construction of tank ditches in all soil types.
One dozer and one scoop loader, grader, or CEV as a team. This step is performed the same as the previous method except that the loader or CEV is used in place of vehicle #2. The grader is available to keep the berm straight and built up. After the ditch is constructed, and if time permits, the berm can then be further shaped. Normally, this method would be less productive than the first method. Again, more than one team may be used to construct the ditch.
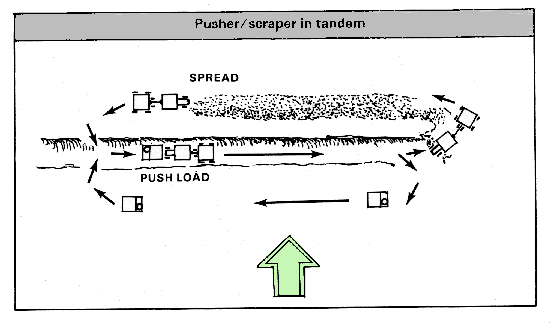
Tractor/scrapers in tandem as a team. Using tractor/scraper in tandem as a team is an excellent method of tank ditch construction. The scrapers can have the pan attached or use the tractor in a bobtailed configuration as a pusher to assist in loading. Each loaded scraper travels the full length of the tank ditch and exits toward the friendly side of the ditch to spread the load and form the berm. A grader can also be used to shape and smooth the berm which will reduce scraper-operator fatigue. "Bean bag" lights can assist during night operation to guide operators and particularly to mark the turn out point. This method utilizes only horizontal construction assets, and may free other diggers such as M9s, dozers, and bucket loaders to perform other missions.
Tractor/scraper and M9s or dozers in tandem as a team. This method uses scrapers as earthmovers and generally requires a pusher (such as an M9, dozer, or bobtailed scraper) to assist loading of the scrapers. As the pusher and scraper exit the ditch, the scraper will turn toward the friendly side to dump the load along the berm; the pusher will exit on the enemy side and proceed back to the beginning of the ditch to pick up another scraper. This method produces excellent results, but requires training to reduce idle equipment time spent waiting for a pusher or scraper.
Operator training is an absolute must to attain maximum production. Experimenting with various equipment combinations and soil conditions is valuable to determine the best production for a specific area of operations and given equipment availability.
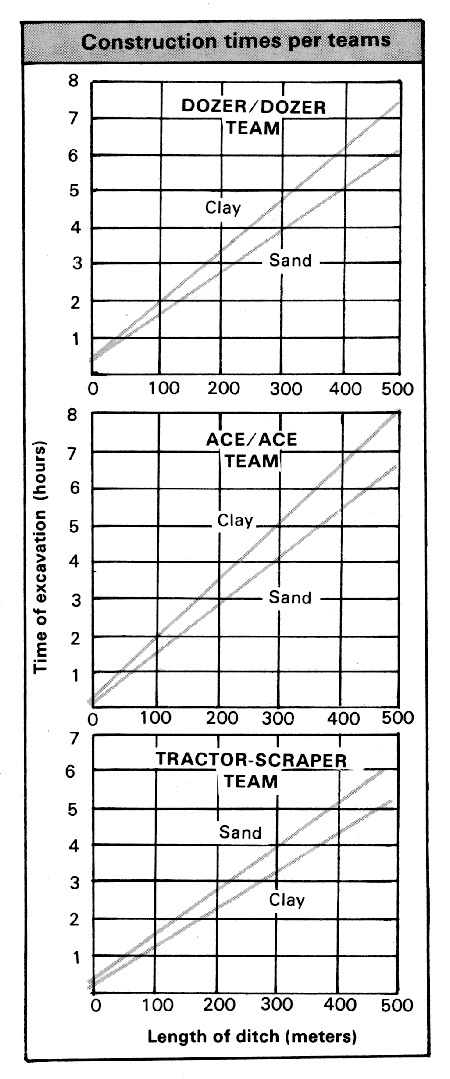
Basic production data of estimated construction times is shown for a 1.5 meter by 3.3 meter ditch using the teams indicated. These production rates are based upon field tests. No significant differences exist between construction of a triangular or a rectangular ditch. Valid test data does not exist for equipment combinations other than those listed.
Tank ditching can be accomplished under blackout conditions. However, production will not be as great, and certain precautions need to be taken. Equipment operators need an object such as a "bean bag" light or flashlight with red lens to focus upon to assist in digging a straight ditch. Also, night vision devices, if available, are excellent for operators to use. Scraper operators particularly need to have a guide or light to lead them out of the ditch and prevent turning out early and overturning. Night operations will be a must in order to emplace the number of tank ditches that will probably be necessary. Commanders should recognize this fact and train under conditions of darkness.
The utilization and effectiveness of explosives for tank ditching are still being studied. Considerable effort has been devoted to the subject. The concept of using liquid bulk explosive and buried pipes is currently being tested and evaluated. This concept has significant advantages; for example, the pipes are buried during peacetime and, when a tank ditch is required, the pipes are filled with explosive and detonated.
The cratering methods described earlier can also be used to explosively create tank ditches. Some clearing and shaping of the ditch will normally be required to increase its effectiveness.
When encountering hard soils or rocky ground to be excavated, rippers used to loosen and break the soil aid in excavation and are the most economical. Should the rippers be unable to loosen the material for excavation, "preblasting," or the use of demolitions could be employed using shaped, cratering, line, or buried tamped explosive charges to breakup the ground. This technique will shatter the material sufficiently to make excavation easier and thereby raising production rates. An advantage to be considered is that preblasting allows less powerful pieces of equipment, like the tractor/scraper, to dig ditches out of previously hard material.
Should the tactical situation dictate that dozers be used for other tasks, preblasting may make it possible to excavate with scooploaders. With dozers, preblasting may substantially increase production rates and decrease "downtime." Preblasting will surely decrease wear and tear on machines and operators.
For the combat engineer who has limited types and numbers of equipment, limited capability, and large numbers of tasks, equipment utilization in conjunction with preblasting may turn an impossible tank ditch mission into merely a difficult one.
Expedient obstacles are basically created by using what nature has placed in the area. Imagination and ingenuity are the key factors in successfully constructing and employing expedient obstacles. The possibilities for expedient obstacle creation are almost endless. A few of the more obvious are:
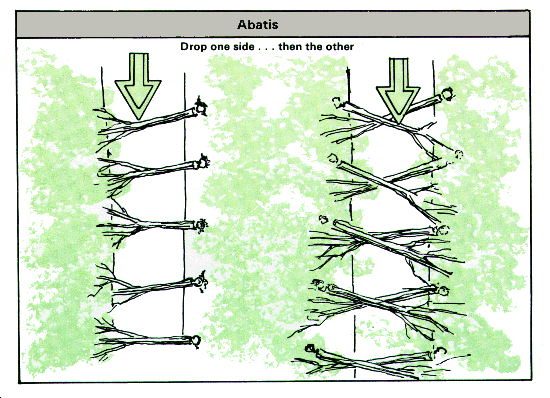
An abatis is an effective obstacle against tanks and other vehicles in a heavily-wooded area with few roads or trails. An abatis can be constructed rapidly using demolition to fell trees. The trees should be felled at a 45-degree angle to the road or trail. The tree should remain attached to the stump to make the obstacle more effective and difficult to clear.
To calculate the amount of explosive necessary for tree cutting, use the formula: D (diameter of the tree trunk, in inches) squared divided by 50, for a test shot.
This formula is used to compute the amount of TNT required. The results of the test shot will determine if more or less explosive is necessary for subsequent shots.
Place the charges at a height of 5 feet above the ground. The trees will fall toward the side where the explosive is placed. One side of the abatis should be blown, and the other side delayed, until the first row has fallen.
If time allows, mines, wire, and booby traps can be added to make clearing more difficult. Modular Pack Mine System (MOPMS) exploded on the obstacle adds an excellent tank "killer" capability.
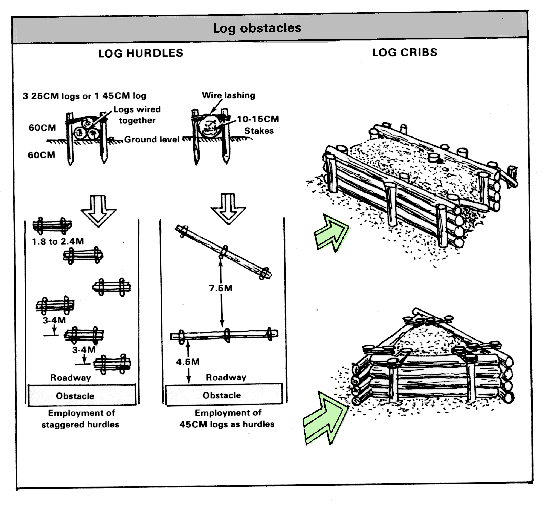
There are many different types of log obstacles that can be constructed using local materials. Log obstacles are most effective when the lack of a bypass forces the enemy to breach them. Although they are time and labor intensive, and locations for their employment are limited, they do not require much logistic support. Log obstacles can be constructed entirely by hand. The availability of chain saws and bucket loaders or backhoes will significantly reduce construction time. Log obstacles can and should be used in conjunction with other obstacles to increase their stopping power.
Log hurdles can be constructed using logs greater than 10 inches in diameter. The size of the logs will dictate if the hurdles should be constructed of single logs or multiple logs tied together. On level ground, log hurdles will not stop tanks, but will cause them to slow down. Hurdles will improve the effectiveness of other obstacles by slowing enemy vehicles and making them more vulnerable to friendly weapon fire.
Log hurdles can stop tanks on uphill grades. The significant factor is determining how high to construct the hurdle. A field expedient method to determine the height of the hurdle is to use a stick about 12 feet long, stick the uphill end in the ground, and depress the stick until it is level. The distance between the downhill end of the stick and the ground is how high to construct the hurdle. The hurdle should be sited on the steepest part of the slope and as near the top as possible.
Rectangular or triangular log cribs are used effectively as roadblocks where standing timber is available, and where such an obstacle cannot be readily bypassed. Unless substantially built, obstacles of this type are not effective against heavy-tracked vehicles. Cribs are strengthened by filling them with earth. It is preferable to obtain the earth by digging a shallow ditch in front of the obstacle. Log hurdles in front of a log crib will force vehicles to reduce speed and add to the effectiveness of the roadblock.
Posts are among the best antivehicular obstacles because each post presents breaching problems to the attacker. There are no fast methods of breaching a belt of posts. Normally, the attacker will try to bypass such an obstacle. Therefore, post obstacles should be placed where bypass requires much time and effort. Posts should be hardwood with a minimum diameter of 40 centimeters (15.8 inches).
All posts are buried 1.5 meters (5 feet) in the ground, either vertically or at a slight angle toward the enemy, and project between 75 to 120 centimeters (30 to 48 inches) above ground level. The height should vary from post to post. The minimum acceptable density for posts is 200 per 100 meters (328 feet) of front. The spacing should be irregular, with at least 1 meter (3.3 feet), and not more than 2 meters (6.6 feet), between posts.
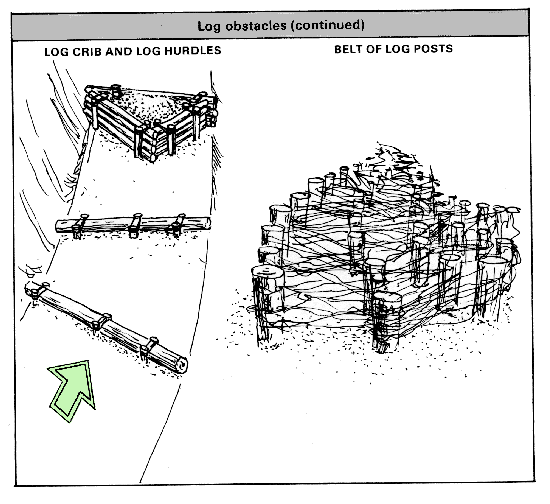
The effect of post type obstacles can be improved, and the obstacles made more difficult to breach, by weaving spirals of barbed wire among the posts. Exploding MOPMS into the obstacle after completion greatly increases its effectiveness. Conventional mines can also be used to make the obstacle more difficult to breach.
Rubble created as a result of combat in towns and villages can be used as obstacles in certain situations. Buildings can be intentionally rubbled by the 165 millimeter (mm) demolition gun on the CEV or by use of explosives. Mines added to the rubble will greatly prolong the clearing process.
When used to create road blocks, these items should be securely anchored to the ground if material and time permit. Using mines with the obstacle increases its effectiveness.
Controlled flooding can be an effective expedient obstacle. Demolishing dams, canal walls, or levees can cause flooding to impede enemy movement.
Controlled burning of wooded areas, wooden bridges, and other areas is another expedient obstacle method to prevent enemy use. Both flooding and burning generally fall into the area of denial operations and will be closely controlled.
Expedient methods of obstacle creation are limited only by imagination and ingenuity. The ability to find something that works when there appears to be nothing available is a long-standing trait of the American soldier.
Preconstructed obstacles are obstacles that are prepared in peacetime for rapid execution once hostilities begin. They are generally designed and constructed not to be obtrusive or interfere with vehicular traffic until executed. Preconstructed obstacles are generally of the following types:
Preconstructed obstacles reduce the military effort for obstacle emplacement. They also greatly expedite the emplacement process once the appropriate alert or readiness posture is given.
Once a location for a preconstructed obstacle is selected, a request is forwarded through military channels to the host nation defense ministry. The location is based upon good military obstacle location techniques. The host nation will then evaluate the request and be responsible for the construction of the obstacle and the demolition storage site if one is required.
A target folder with all pertinent information will be prepared by the military region command in whose area the obstacle is located. A copy of the demolition target folder will be provided to the engineer unit responsible for execution of the obstacle.
Wallmeister teams, a unit of the host nation Territorial Army, assist and support the engineer commander in all aspects of engineer technical subjects in the assigned area. The Wallmeister will perform maintenance and security checks of the preconstructed obstacle fixtures at regular intervals.
The prechamber shaft system consists of an array of several individual demolition shafts designed to permit rapid execution of crater obstacles. The demolition shafts are constructed of concrete pipe and located on roads, railroads, and bridge abutments.
The individual demolition shafts that comprise the system are 4 to 6 meters (13 to 20 feet) deep and 60 centimeters (24 inches) in diameter. The shafts are installed either vertically or at an angle, and each shaft is closed by a steel shaft cover which resembles a sewer manhole cover. Two detonation cord conduits are installed in a straight line from the interior of the demolition shafts to a metal cover box installed in the embankment or curbstones of the road. These conduits are provided to accommodate the main and reserve firings systems.
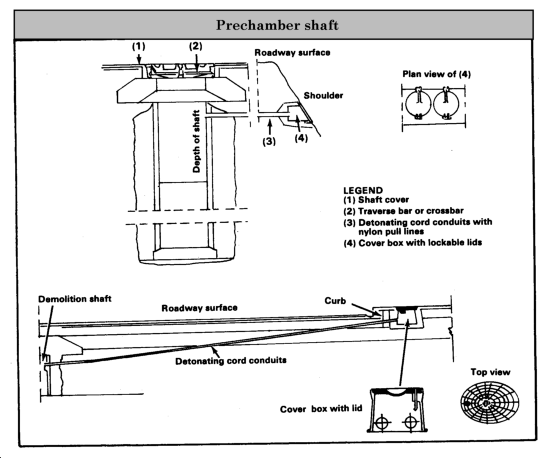
The demolition material required for a prechamber shaft system is stored in a nearby 5-ton bunker complex and is earmarked for the sole use at its designated obstacle site. The prestocked demolition material consists of:
In addition to the demolition materials, several special tools are necessary to install the target. One T-handle wrench, two shaft cover lifting hooks, and two loading poles are usually organic to most European-based combat engineer squads. In some instances, these tools may be stored at the obstacle site. The T-handle wrench and shaft cover lifting hooks are stored in one cover box, whereas the loading poles are stored in one of the demolition shafts.
The opening and loading of prechambers should begin at the prechamber shaft located nearest the enemy and progress towards the friendly side. This is also the order in which demolitions should be off-loaded at each shaft. To open the shaft, use the T-handle wrench to remove the safety cap and loosen and unscrew the hexagonal nut. Insert the cover lifting hooks in the shaft cover; lift the cover off the shaft and place it to the side of the prechamber. Lift the traverse (located beneath the cover) by rotating it in a circular motion until it hits a stop which will allow one end to tilt toward the top of the prechamber and be removed.
To load a prechamber shaft with 25-kilogram cheese charges, the loading pole sections are screwed together and hooked into the carrying handles of the demolition charge. The charges are lowered into the shaft and stacked on top of the others. The last charge in each shaft is lowered only after it has been dual primed nonelectrically with branch lines.
The firing systems are installed by pulling the branch lines through the conduits which run beneath the road surface from the shaft to the cover box. Once the end of the branch line has been pulled through the conduct using the plastic lines provided in the conduit, the crossbar is replaced, and the shaft cover secured in place. Both primary and reserve ring mains are laid to the side of the roadway for attachment of the branch lines.
The standard planning factor for complete installation of a three-shaft system dictates that a nine-member squad requires 90 minutes to complete the task.
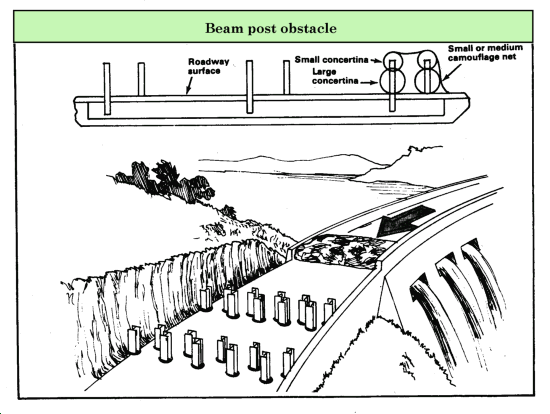
The beam post obstacle is designed for blocking roads at defiles without destroying the pavement. The obstacle consists of steel I-beam posts inserted into preconstructed shafts in the road width which prevents movement of all vehicles, wheeled or armored. A minimum of two double rows of shafts must be preconstructed into a concrete foundation. Within each double row, the individual shafts must also be staggered. Each beam post shaft is 80 centimeters (31 inches) deep and has a steel cover. The I-beam post is constructed of sectional steel, 2.2 meters (7.2 feet) long and weighing 216 kilograms. When inserted into the shaft it will extend 1.4 meters above the road surface. Each steel I-beam post is equipped with locking devices which prohibit the enemy from pulling them out of the shafts.
The beam post obstacle is emplaced by removing the shaft covers after unscrewing the hexagonal nuts with T-handle wrenches. Lifting hooks, organic to an engineer squad, are used to place the shaft covers to the side. As with the prechamber shaft system, removal of the crossbar allows access to the shaft. Carrying bars are employed to bring the I-beam posts to each shaft. Each beam is a designated four-soldier carry for lowering the posts into the shafts. Once emplaced, the enemy side double row may be improved through the addition of concertina wire and camouflage netting.
The standard planning factor for complete installation of a beam post obstacle 12 meters (39 feet) in width, three double rows deep (requiring a total of 54 I-beam posts), dictates that two squads, each with nine members, require 2 hours to complete the task.
Demolition fixtures in bridges permit the destruction of such targets by expediting the installation procedures and simultaneously allowing friendly use of the bridge. There is a demolition target folder prepared for each bridge equipped with a demolition fixture. Primarily, three types of bridge fixtures exist throughout the European Theater:
1 Charge mounting brackets.
2 Demolition chambers.
3 Demolition galleries.
1 Charge mounting brackets are sheet metal rails permanently mounted to the base of the supporting columns of a bridge. They are used to facilitate the placement of cutting charges and to insure their secure attachment. The 9-kilogram, DM19 cutting charge is equipped with lockable standoff sliding slats which are "L" shaped at the bottom for installation into the charge mounting brackets.
2 Demolition chambers are cavities built in the intermediate support columns and abutments of bridges. These types of fixtures are secured by means of a locked metal access panel. Demolition chambers are designed to accommodate large quantities of conventional munitions, cratering charges, and satchel charges.
3 Demolition galleries are constructed in very large bridges. The galleries lead under the abutments of bridges or under the roadway and terminate in a demolition chamber or cavity. Because of the large quantities of explosives necessary to destroy such large targets, the galleries are constructed to allow the uninhibited movement of personnel carrying munitions to the chambers. The primary demolition material used to execute this type of target is the 25-kilogram, DM41, cheese charge. Bridge fixtures of this nature have permanently installed electric firing circuits through a series of conduits usually from one chamber to the next. Both the main and reserve firing systems end in a distribution box located at the abutments.
Before preparing abridge for deliberate demolitions in accordance with the demolition target folder, prepare the target for hasty demolition, if feasible. Because no demolition material is earmarked for hasty demolition, it must be taken from the combat load of the pertinent unit. As the demolition target is being prepared for deliberate firing, the charges for hasty demolitions will be removed.
Planning data on required labor, material, and time for loading and preparing the target for firing can be found in the respective demolition target folder.
The terrain in Korea is rugged with narrow armor approaches between mountains. The need for rapidly emplaced antiarmor obstacles, coupled with restricted terrain, makes preconstructed obstacles an excellent choice.
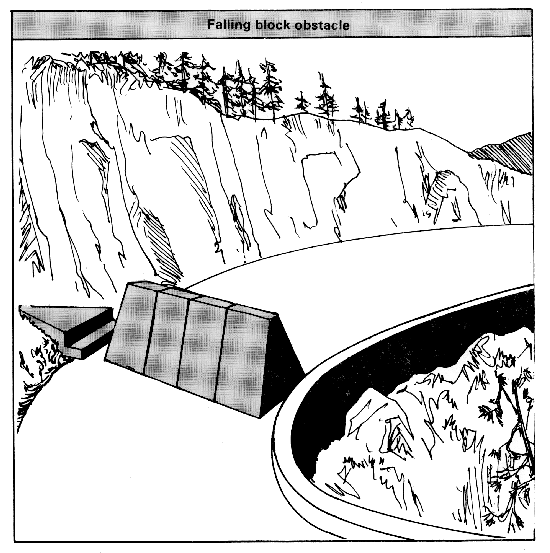
Varying types of preconstructed, obstacles are found in Korea, the majority being the falling block type. These are large concrete blocks suspended above or beside the roadway. Demolitions are stored nearby to blow the concrete block supports when the appropriate alert measure has been received and the tactical situation permits. Preconstructed obstacles are the responsibility of the Korean Government to construct, and the Republic of Korea (ROK) Army to maintain and execute.
Other types of in-place obstacles are tank walls, mined areas, and obstacles at selected river crossing sites. Preconstructed obstacles are key to the defense in that they are properly located and can be executed quickly with minimal manpower. Tactical considerations and advantages of preconstructed obstacles are numerous. For example, they--
Once installation of the demolition is complete, the obstacle can be immediately executed or delayed to fit the tactical situation. Preconstructed obstacles are complementary to other types of reinforcing obstacles and greatly assist commanders in fighting the AirLand Battle.
Atomic Demolition Munitions (ADM) are nuclear demolition devices used primarily for obstacle creation or denial operations. ADM can only be used when the authority to employ nuclear weapons has been granted. In the AirLand Battle, commanders should plan for, request release of, and use nuclear weapons at the time when they will have the greatest effect on the enemy. Special characteristics make ADM most desirable on the battlefield. These characteristics are discussed in the following paragraphs. The Special Atomic Demolition Munition (SADM) is the ADM system currently in use. The SADM can be carried by personnel, and is a low yield weapon fired by a timer mechanism.
Atomic Demolition Munitions have a much higher destructive power than conventional explosives. In order to achieve similar effects, a massive amount of conventional explosive would have to be used. The logistic and manpower requirements are greatly reduced when ADM are used rather than conventional explosive. There is no delivery error with ADM. This is a significant advantage over any other type delivery system when absolute accuracy is required such as a bridge or tunnel. Fallout, induced radiation, and collateral damage can be controlled or minimized by using ADM. A much larger yield weapon would have to be used to compensate for delivery error.
For example, consider the destruction of major highway bridges. A subkiloton SADM detonated subsurface in the center of the highway would create the desired obstacle. Considering delivery error associated with artillery-, aircraft-, and missile-delivered systems, and the inability to detonate these delivered systems at the surface or subsurface, yields in the 50-kiloton range would be required to assure creation of the desired obstacle with any other nuclear system. The advantages resulting from using the lower yield ADM in tactical operations are significant.
Most tunnels cannot be severely damaged or destroyed with conventional explosives because of the vast quantity required and the difficulty to concentrate the explosive power of such a large volume at a single point. An ADM placed inside most tunnels will severely damage them and create an obstacle that could take several weeks to breach.
In order to effectively crater a major highway with conventional explosives, a large amount of haul capacity, personnel, demolitions, and--most important--time would be required.
A low yield SADM detonated subsurface or on the surface would produce an obstacle that the enemy could not breach with assault bridging. Breaching would require extensive foundation preparation and installation of a fixed bridge. Even when not under fire, such construction could require days to complete.
Preparing a major highway bridge could require an engineer battalion's entire haul capability and several company hours when using conventional explosive demolitions. The same bridge could be destroyed in a few minutes by an ADM firing team with a low yield SADM.
Other potential ADM targets include massive dams, canals, airfields, railroad switch yards, ports, industrial plants, power facilities, supply depots, and narrow valley defiles.
The primary purpose of ADM is to create obstacles. The purpose of any obstacle or system of obstacles is to control enemy movement. This control means to stop his movement, slow his rate of advance, or change the direction of his movement. Once the enemy has been stopped, he must decide whether to breach or bypass the obstacle. He loses time during this decision process and presents a good target to friendly weapons. If he decides to breach the obstacle, he loses more time because his rate of advance will be slowed. Forces awaiting the completion of the breaching operation will present vulnerable targets. If he decides to bypass the obstacle, he loses time because of the less direct route to his objective. When ADM or any other obstacles are emplaced, friendly forces should consider the bypass routes available and also create obstacles there or plan direct or indirect fire.
In both offensive and defensive roles, the ADM acts as a combat multiplier. ADM used to reinforce terrain will create very significant obstacles in terms of cratering and tree blowdown. When covered by direct or indirect fire and reinforced with scatterable mines, the enemy must expend considerable resources to overcome the obstacle and will most likely choose to bypass it. The residual radioactive contamination adds to the obstacle's effectiveness. The overall effect is to cause local concentration of enemy forces, thus creating better targets for conventional and nuclear weapon systems.
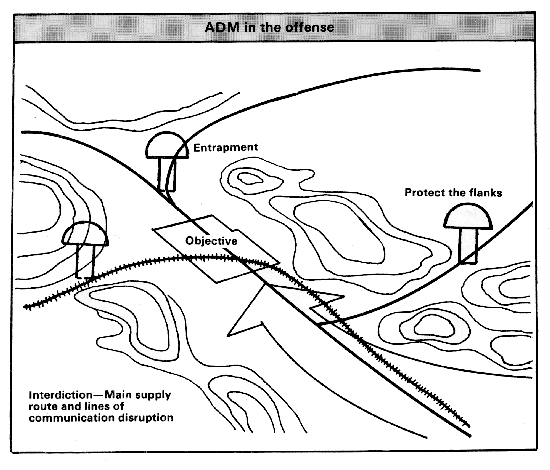
One of the roles that ADM can play in the attack is to provide protection to the flanks of the attacking formation, particularly in cross compartmented terrain. The ADM can be used to seal likely enemy counterattack avenues of approach. Another role for ADM in the offense is to create obstacles behind the enemy to prevent escape from the attacking forces. Yet another is a close interdiction role to separate enemy first and second echelon forces by destruction of key highway and rail bridges in enemy territory. The ADM can also be used in rear areas to disrupt main supply routes. Special Operations Forces (SOF) augmentation will most likely be required for ADM placed behind enemy lines.
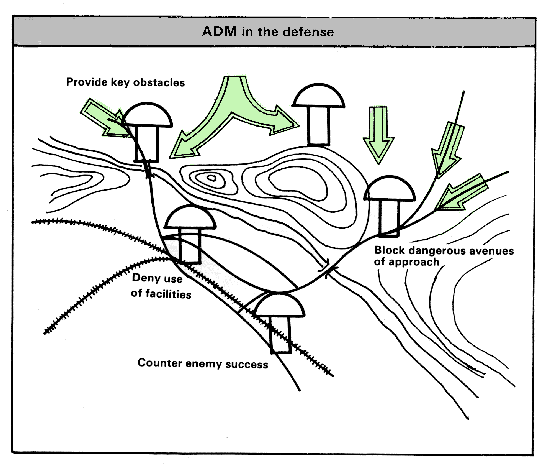
The greatest utility of ADM is in defensive operations. The effective creation of critical obstacles can enable a relatively small force to hold off a large attacking force until reinforcements arrive. In the defense, ADM is used to create key obstacles, block dangerous avenues of approach, and deny the enemy use of important installations and facilities.
Obstacles other than minefields span the spectrum from a simple log hurdle to a very complicated and precise bridge demolition. Methods, materials, and equipment span the same spectrum. Several simple rules should be followed when selecting and emplacing obstacles other than minefields:
Know threat capabilities and make sure that the obstacle or obstacles selected will accomplish the mission.
Know the capabilities of your soldiers and their equipment.
Plan early; time is generally the most critical resource in obstacle construction.
Tie the obstacle in with existing or other reinforcing obstacles.
Cover the obstacle by fire if at all possible.
Know the future mobility plan of friendly forces.
Forecast logistic and haul requirements early.
Train with combined arms team at every opportunity.